Sometimes, households face unexpected challenges that demand quick thinking. A leaking roof is one of those alarming problems that can undermine your home’s structure and comfort if left unaddressed. The moment you spot a drip from the ceiling or see a suspicious water stain, it’s natural to feel a sense of urgency. But with the right practical steps, you can control the situation and minimize damage before it spins out of control.
Below, you’ll find three immediate steps to guide you through the first critical hours of addressing a roof leak. These steps enable you to prevent interior damage, contain the water, and plan necessary repairs. The ultimate goal is to ensure that your home’s roof—a vital protective layer—remains strong and secure.
Understanding the Urgency
When a roof leak becomes apparent, every moment counts. Water infiltration can weaken wooden structures, stain ceilings, and promote mold growth. If left unhandled for too long, a small leak can escalate into a costly structural problem. By acting quickly, you address the root cause before damage spreads to insulation, electrical systems, or drywall.
Embracing a calm, methodical approach is often your best defense. Imagine stepping into a mild shower of water droplets in the middle of your living room. Instead of letting panic set in, you take a breath, gather the right tools, and commit to tackling the issue step by step.
Step 1: Contain and Control the Water
The first goal is to divert or collect water to minimize further damage. Even a tiny leak can cause significant issues if allowed to soak into your floors, walls, or furniture.
- Place Buckets or Containers
- Position buckets, bowls, or large containers directly beneath the leak.
- In tight spaces, use small pans—or even plastic waste bins—to catch dripping water.
- Protect the area around the container with old towels or plastic sheeting to limit splashing.
- Relieve Water Pressure from Bulging Ceilings
- If water accumulates in a specific ceiling spot, you might see a bulge or sag. Carefully poke a small hole in the center of the bulge to let water release.
- Use caution: place a container beneath this newly created drainage point to catch the flow.
- Though it might seem counterintuitive to create a hole in your ceiling, doing so prevents a more forceful ceiling collapse later.
- Move Items to Safety
- Water can damage almost anything it touches, so shift furniture, electronics, rugs, or valuables out of the leak’s path.
- Lay down towels or plastic sheets to further protect the room.
- Even if drips appear minor, be proactive to reduce the overall risk of water damage.
Why Containment Matters
Containment safeguards your home’s interior and prevents your belongings from sustaining catastrophically costly damage. It also creates a safer environment for the next steps of inspection and repair—no one wants to slip on a slick floor or inadvertently stand under a soaked ceiling that could give way. By diligently containing water, you fortify your home’s resilience against immediate threats.
Step 2: Pinpoint and Inspect the Source
After containing the leak, the next move is understanding where the water is coming from. Knowing the exact source allows you to plan the best repair strategy. While rooftop repairs may require professional help, you can gather preliminary information about the leak’s origin to expedite the process.
- Start with an Interior Inspection
- Trace the path of the water from the dripping point backward, looking for discolored or damp spots on your ceiling or walls.
- Look for peeling paint, bubbling wallpaper, or musty odors. These signs often appear near leaks and can point you toward the source.
- Use a flashlight in dark areas like attics or closets to spot even the faintest signs of moisture.
- Assess Your Attic
- If you have an attic, carefully head up there with a flashlight. Check for water stains along rafters or floorboards.
- Remember to exercise caution when walking on attic joists and wearing protective gear if insulation or other debris is loose.
- If the leak is small, you might see slight discoloration; if large, you’ll likely find noticeable damp spots or even pooled water.
- Check External Factors
- Inspect your roof from the ground if it’s safe and daytime. Look for loose or missing shingles, damaged flashing around chimneys, or worn-out seals around vents.
- If a storm recently passed, consider wind-blown debris or fallen branches that may have punctured your roof.
- Examine your gutters. Clogged or damaged gutters can redirect water beneath shingles and into your home’s structure.
Safety First
Clambering around in your attic or on your roof comes with risks. If you suspect major roof damage or have to climb onto a steep roof, strongly consider professional assistance. For guidance on ladder safety, you can consult official resources from OSHA. Engaging an expert might be the most efficient way to prevent time-intensive or dangerous mishaps.
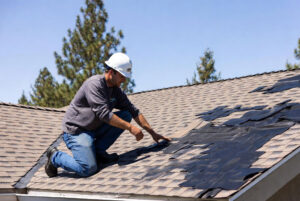
Step 3: Contact Professionals and Plan Repairs
Once you’ve contained the water and investigated the leak’s possible source, the third step is taking swift action to finalize repairs. Even if you discover a small hole that you think you can patch temporarily, a qualified roofing professional can verify the structural integrity of your entire roof. Addressing a leak effectively ensures you won’t face a bigger issue (or repeated leaks) down the road.
- Document the Damage
- Snap photographs of affected areas, both inside and out.
- Make a quick list of what you’ve observed: dripping rate, location, visible structural damage like cracks or water stains.
- Detailed notes make it easier for your roofing contractor or insurance adjuster to understand the situation.
- Call a Trusted Roofing Contractor
- Seek recommendations from friends or neighbors, or check reputable online directories to find licensed professionals.
- Before hiring, verify their experience level, certifications, and insurance status. The National Roofing Contractors Association is a helpful resource for finding vetted experts.
- Ask for an estimate and timeline. The professional might offer temporary measures (like a tarp) if immediate repairs can’t start right away.
- Notify Your Insurance Company
- Contact your homeowner’s insurance provider to see if your policy covers roof leak repairs.
- Provide them with photos, notes, and any expert evaluations you’ve obtained.
- Insurance coverage varies, but it never hurts to consult your insurer for guidance on making the most of your policy’s benefits.
Effective Repair Strategies
Professional roofers often take one of several approaches depending on the severity and location of the leak. They might replace loose or missing shingles, seal gaps around chimneys or vents, or replace entire sections if the area is severely compromised. In some cases, a full roof replacement might be recommended if existing materials are too aged or severely deteriorated. Regardless of the extent of the fix, acting quickly and partnering with qualified experts prevents future leaks and extends the lifespan of your roof.
Common Causes of Roof Leaks
Every leak has a story, and understanding these common causes helps you remain vigilant and proactive:
- Damaged Shingles
High winds or hailstorms can rip off or crack shingles, leaving the underlayment exposed to the elements. - Worn-Out Flashing
Flashing seals the transitions around chimneys, skylights, or vents. Over time, it can corrode or loosen. - Clogged Gutters
When gutters overflow, water has few escape routes, often forcing its way under the roof’s edges. - Poor Ventilation
Inadequate attic ventilation can lead to moisture build-up and eventually create conditions conducive to leaks. - Aging Materials
Roofing materials naturally deteriorate. Aging roofs are more susceptible to small breaches that soon become big leaks.
By recognizing these triggers, you can identify early warning signs and schedule routine roof checks, ideally with a professional who can recommend preventative repairs.
Real-World Example
Consider a homeowner named Sarah who noticed a tiny bubble in her bedroom ceiling paint one morning. When she touched it, water dripped down her finger. Rather than panic, she placed a plastic container under the spot and shifted her dresser and electronics to a safer area. Then, she climbed into the attic and discovered moisture around the base of a vent pipe. Recognizing that she lacked specialized roofing knowledge, she documented what she saw and contacted a local roofing contractor.
The contractor quickly identified cracked flashing around the vent pipe. While up on the roof, the contractor also noticed a few loose shingles—a problem Sarah had been unaware of. Because she promptly contained the water and engaged a professional, the roof was patched in a few hours, and serious damage to the underlying structure was prevented. Sarah’s quick action saved her both money and stress, offering a powerful reminder that early intervention pays off.
Preventive Measures You Can Take
Even the best roofs need care and attention. Preventive actions can dramatically cut down on the likelihood of discovering water dripping into your home during a stormy night. Here are a few to consider:
- Regular Roof Inspections
Schedule a professional inspection annually or biannually, especially if your roof is older or you live in an area with frequent storms. - Clean and Maintain Gutters
Remove leaves, branches, and debris from gutters regularly. This ensures that rainwater flows freely away from your roof. - Keep Trees Trimmed
Overgrown branches that scrape against your roof can loosen shingles and increase debris accumulation in gutters. - Check Attic Ventilation
A well-ventilated attic prolongs the lifespan of your roof by balancing heat and moisture levels. - Prompt Repairs
At the first hint of shingle damage or minor leaks, address them promptly. Delaying simple fixes today can lead to expensive overhauls tomorrow.
The Bigger Picture
Your roof not only shields you from rain, wind, and snow; it also has a major influence on your home’s energy efficiency, interior comfort, and structural reliability. When you see a leak, it’s a sign that an essential part of your house’s protective system has been breached. Taking prompt, strategic steps keeps that breach from growing worse.
Although the initial scare of a leak can raise your stress levels, it also presents an opportunity for you to solidify your home maintenance routine. Evaluate your roof’s age and overall condition, research reputable local contractors, and ensure you have the right homeowner’s insurance coverage. These steps keep you prepared for whatever challenges life may send your way.
Moving Forward with Confidence
Leaking roofs can happen to anyone, often without warning. The empowering news is that you can overcome this challenge by being proactive and well-informed. Quick containment, accurate inspection, and timely professional intervention allow you to regain control of your home’s safety and avoid escalating costs. Each leak, no matter how trivial it may seem, is a reminder that our homes need periodic tune-ups—just like our cars, bodies, and gadgets.
You now have a roadmap for immediate action and prevention. By understanding that each step builds on the previous one, you’ll find it simpler to stay calm under pressure and address issues swiftly. With a little foresight and readiness, a roof leak becomes a manageable puzzle rather than a cause for panic.
Final Reflections
When water seeps through your ceiling, it’s easy to feel overwhelmed. Yet within that initial moment of alarm lies an opportunity. By placing buckets to catch the drip, investigating the source, and calling in the right roofing professionals, you’ll ultimately emerge with a stronger, more secure roof above your head. Through these experiences, we learn the importance of regular checks, timely fixes, and a calm mindset that turns any household challenge into a chance to strengthen our homes.
No leak is welcome, but with these three urgent steps in mind, you’ll be equipped with the know-how to protect your home anytime water threatens your peace of mind. Let this knowledge flow into all aspects of your home maintenance. When you take action at the first sign of trouble, you fortify not just your roof, but the entire safety net that envelops your loved ones.